AWS Tutorial: Create VPC and Launch Instance Using CLI

In this tutorial, i will describe the steps required to create a VPC using AWS CLI.
Prerequisites
1. You need to have a configured AWS CLI on your system. (Refer this tutorial: Configure AWS CLI)
Create VPC using CLI
The first step in creating VPC is deciding on the CIDR range. The maximum CIDR range you can have on AWS is /16 network. In this tutorial, i am going to create a VPC with CIDR range 10.0.0.0/16. Please note down all the id’s created in a notepad when you are executing the command.
step 1: Create VPC
To create VPC, we have an AWS CLI command.create-vpc Execute the following command to create a VPC with 10.0.0.0/16 range.
aws ec2 create-vpc --cidr-block 10.0.0.0/16The above command will give an out with a parameter named.VpcId Note down the Id because we would need it for further commands.
Note: If you want to learn AWS from scratch for want to prepare for AWS certificate programs, you can go for Ryan’s Courses on Udemy. You can get these $197 worth of courses for just $9.99 using coupons from here –> A Cloud Guru AWS certification Udemy Course Coupons
Step 2: Create Subnets
Next, we need to create subnets for the VPC we created. Subnets basically give you a segregation for your application. Let’s say you have a front end, app tier, and Db tier. You might need 6 subnets to host that application in high availability mode.
For this demo, I will create two subnets, one private and one public.
Execute the following command to create a subnet using create-subnet command
Note: Replace the VPC Id with yours.
aws ec2 create-subnet --vpc-id vpc-99e344fd --cidr-block 10.0.1.0/24Create the second subnet using the following command.
aws ec2 create-subnet --vpc-id vpc-99e344fd --cidr-block 10.0.2.0/24Note down the subnet id from the output. We will need it later.
Step 3: Create Internet gateway
If you want to access ec2 instances over the internet, you should attach an internet gateway to your VPC.
You can create an internet gateway using create-internet-gateway command. Execute the following command to create one.
aws ec2 create-internet-gatewayNote down the InternetGatewayId from the output.
Step 4: Attach Internet gateway to VPC
Attach the internet gateway to the VPC using ec2 attach-internet-gateway command as shown below. Replace the id’s with your id’s accordingly.
aws ec2 attach-internet-gateway --internet-gateway-id igw-5d685a38 --vpc-id vpc-99e344fdStep 5: Create Route Table
First, create a route table. Replace the VPC id with yours.
aws ec2 create-route-table --vpc-id vpc-99e344fdNote down the RouteTableId
Step 6: Add Internet Gateway Rule
Attaching internet gateway does not make all the subnets public. If you want to make a subnet public, you need to add a route table with internet gateway to the subnet.
aws ec2 create-route --route-table-id rtb-b86fe2dc --destination-cidr-block 0.0.0.0/0 --gateway-id igw-5d685a38Step 7: Associate Route Table to a Subnet
Associate the route table with the second subnet using associate-route-table command and the ids.
aws ec2 associate-route-table --route-table-id rtb-b86fe2dc --subnet-id subnet-3b839262Now our second subnet is a public subnet as we associated a route table with internet gateway rule. We can now launch an instance to the public subnet which can be accessed over the internet. If you launch an ec2 instance in the private subnet (first subnet – 10.0.1.0/24), you will not be able to access it as it does not have an internet gateway rule. But all the instances in a VPC can talk to each other using its private IP’s.
Launching an EC2 instance
Now we will launch an EC2 instance in the public subnet using CLI. I hope you have all the id’s noted down in a text file. We will be using those id’s for instance launch.
There are few parameters you should know before launching the instance.
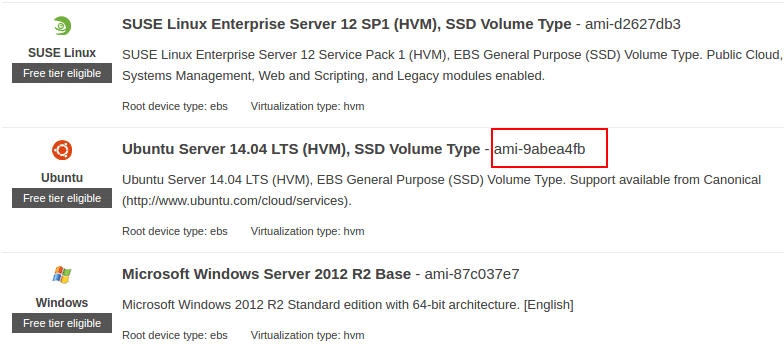
1. AMI ID: id of the image (OS) that you want to launch.You can get this id from the AWS launch wizard as shown below.
2. Security Group ID: Create a security group and get the id.
3. Subnet ID
4. Key pair Name – Create a key pair and note down the name.
Execute the following command with relevant ID’s to launch the instance in public subnet.
aws ec2 run-instances --image-id ami-9abea4fb --count 1 --instance-type t2.micro --key-name test-key --security-group-ids sg-af7a50c8 --subnet-id subnet-3b839262 --associate-public-ip-address
Good
very good
very nice, it works well all the way.